
The main Tool bar contains options that allow you to navigate through Digital Takeoff’s main features. The Main Tool bar remains consistent, no matter which mode you are in. The Sub-tool bar, however, will change depending on the mode selected.
You can also customize the Main Tool bar to add or remove tools and organize the icons to best suit your needs. See the Customizing the Tool bar section below the Main Tool bar tool descriptions.
Tool Descriptions:
TAKEOFF: Select to activate Takeoff mode.
NOTEPAD: Select to activate Notepad mode.
CROP IMAGE: Allows you to crop the visible Sheet (you can remove part of the Sheet and retain only the portion you wish to keep).
To crop the Sheet, click the CropImage button on the tool bar once. Then draw a rectangle around the section of the Sheet you wish to keep. Once the area you wish to crop has been selected, click Crop Image again. The Perform Crop warning box appears and reminds you that the Crop operation cannot be undone. Click OK to continue, or Cancel to abort the procedure.
Note: the Crop Image function is only available in Takeoff mode and can not be done on a Sheet that contains annotations.
PAN IMAGE: Click the icon and your mouse will function as the pan tool that can move across your drawing. Click the Pan Image icon again to toggle this feature off and resume normal mouse functions. Another way to pan in your drawing is to hold the CTRL key while holding down the left or center mouse buttons moving in the direction you want to see.
PRINT IMAGE: Select to print the Sheet image and annotations. For additional printing options, go to File > Print Image.
SAVE IMAGE: Use this option to make annotations permanent on a drawing by saving a new copy of the original image with annotations included. New drawings can be saved as BMP, JPG, PNG, or HI RES .PDF images. For additional save options, go to File > Save Image.
SHEETS: Select to open the Job Setup window, allowing you to add, remove, or modify Sheet information.
REVISIONS: Opens the Manage Sheet Revisions window.
LAYERS: Opens the Layer Properties window, where you can create and modify Layers for Digital Takeoff.
ASSIGN LAYERS: Allows you to assign selected annotations to the Active Layer.
CURRENT SHEET: This drop-down menu allows you to quickly switch between your digitized Sheets. The Current Sheet drop-down selection box allows you to view long sheet names in their entirety. After clicking the down arrow, you can hover over the sheet name to see the complete sheet name.
Customizing the Tool bar:
Right-click in the main tool bar area to see the Customize option. Click on it to open the Customize Tool bar window.
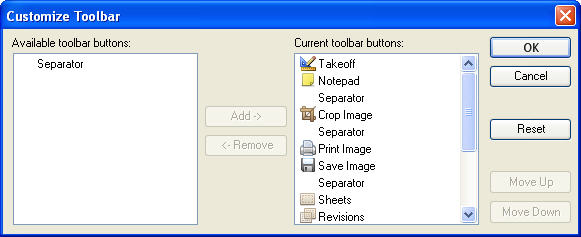
Select a tool bar feature from the right and you can select to add or remove it from the tool bar displayed on your system. You can also use the Move Up and Move Down options to organize the order of your selected tool bar buttons.