Digital Takeoff has the built-in capability of allowing you to see Sheet Revisions by overlaying the Sheets and highlighting the changes made so they stand out. All of the work is done by Takeoff so you simply import the revised plans.
Note: It is recommended to use a scroll mouse for utilizing all of the tools in Digital Takeoff.
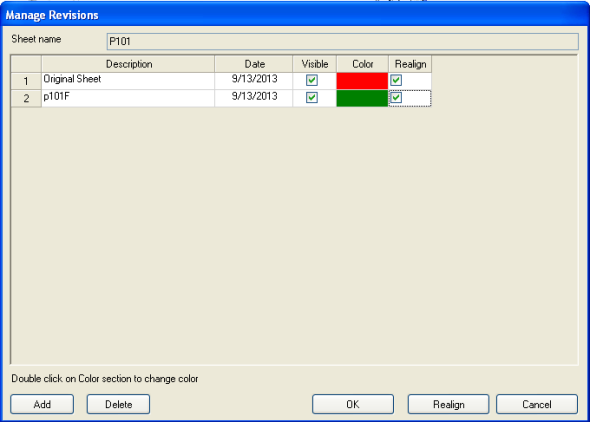
In the Manage Revisions dialog, the active sheet name is displayed. In the grid, you will see the revisions that have been saved with the job/estimate.
The sheets are numbered in the order that they have been added to the job.
There is a Description for the sheet. This field can be edited.
The date that the revision was added.
Use the Visible check box to check which revisions you want to see. If only one revision is shown, it will be displayed as it was originally imported. However, if multiple revisions are shown, they will be displayed on top of each other, using the colors (in the next column) to denote which revision a particular line/object/etc. came from.
So, using the above example – if you only have the first revision visible, it will be shown, normally, just as when it was imported. Likewise, if only the second sheet is visible (has a check mark in the visible column), it will also be shown normally, as if you had imported it as a sheet. However, if you have both checked, then the images are converted to grayscale (if necessary), and then shaded red or green. The two images are combined together into a single image – each pixel that is in both revisions would be black, a pixel that was only on the first revision would be a shade of red, and a pixel that was only on the second would be a shade of green.
The Color of the annotations for this revision. The original sheet will default to red, the first revision will default to green, the second revision to blue. You may change the color on the revised Sheet so it will stand out against the original. Change the color by double-clicking on the color cell.
If your sheets are not lining up evenly or need to be rotated or re-sized, select Realign to open the Sheet Alignment Tool.
Once you have added or edited your revisions, and/or chosen which revisions you wish to view, select OK.
Add: to add a revision, click Add and see the section below.
Delete: to delete a revision, highlight the sheet in the list and click Delete.
To add a Sheet and view the revisions, follow these steps:
Select the Takeoff > Manage Sheet Revisions.
On the Manage Revisions window, you will see the current Sheet listed already.
Click Add. This opens the Update Plan dialog. From here, you can locate and add sheets and edit revision names (if needed). You can also adjust the view settings for your sheet.
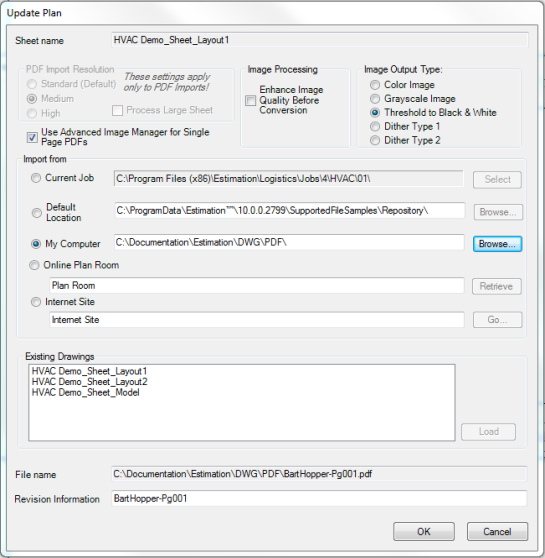
In the PDF Import Resolution section:
**These settings are used only when importing a .PDF.** These settings are NOT used if you have "Use Advanced Image Manager for Single Page PDFs" selected in System Preferences > Settings.
These options control the quality of the sheets imported from PDFs. The higher settings may result in more legible images, but use more memory and may cause performance issues. Very large sheets also may not be able to be imported at the higher settings on some systems. If a sheet that you have imported is blurry or hard to work with, try importing it again at a higher setting.
Standard (Default): This setting is equivalent to 100 DPI.
Medium: This setting is equivalent to 150 DPI.
High: This setting is equivalent to 200 DPI.
Process LargeSheet: Select this check box if you are working with a large image and had previously received an out of memory error when trying to load the sheet.
Use Advanced Image Manager for Single Page PDFs: Select this check box if you want to use the Advanced Image Manager tool (even for single page PDFs) so that you can preview different settings before importing the sheet.
In the Image Processing section:
Enhance Image Quality Before Conversion: Check this box if you want Estimating to perform automated manipulations on the image to improve quality before importing it.
In the Image Output Type section:
Digital Takeoff can perform various conversions on images to make them easier to work with. These options each have advantages and disadvantages, therefore you may wish to make different selections for each sheet you import.
Color Image: If you are importing a color image, and wish to work with the image using its existing colors in Digital Takeoff, select Color Image. This will bring the image without modifying the colors of the image. However, this option will use more memory for each image, and larger images may not be able to be imported on some machines. Images may also exhibit a performance delay in comparison to other types.
Grayscale Image: If you do not wish to view the colors on the original drawing, one option is to import it as a grayscale image, which converts all colors to shades of gray. This option uses less memory than Color Image, but more memory than the other options. Therefore it may perform better than the Color Image, but not as well as the other options.
Threshold to B&W: This will convert the image into a black & white image, containing no shades of gray. Each point (or pixel) can only be black or white. Therefore, when converting the image, the program will examine each pixel of the original drawing and convert them to black or white, eliminating all colors and/or shades of gray. This is the way that previous versions of Digital Takeoff imported images. This option (along with Dither Type 1 & 2) uses the least amount of memory and offers the best performance. If you are importing images that do not contain colors, including gray, this option is recommended.
Dither Type 1: Dithering is a process of making a pure black & white image appear to contain shades of gray by removing dots from lines and colored areas. Dither Type 1 is one pattern that can be applied to achieve this effect. Like Threshold to B&W, this option uses the least amount of memory, and offers the best performance. This option can also appear to display gray lines and areas on the drawing, but it does sacrifice the quality of Grayscale and Color images in favor of better performance.
Dither Type 2: This option functions identically to Dither Type 1, it simply uses a different pattern to create the illusion of shades of gray. In all other respects, it functions identically to Dither Type 1.
When importing images, it is important to know what the source image is: if it is a full color drawing, or it contains gray / shaded areas, or if it is just a black & white drawing. For performance reasons, you should attempt to bring it in with the higher performing options (Threshold to B&W, Dither Type 1, or Dither Type 2) unless you need the additional shades of gray or color.
In the Import from section:
Current Job: select for the active sheet, then click Select. This defaults to the active job folder (opened by "Open Estimate Related Files")
Default Location: Estimating defaults to the image repository set up in System Preferences > Database tab > Folders section. Click Browse to select a different location.
My Computer: select this if the plans are stored somewhere on your hard drive. Click Browse to locate the directory that contains the files, select the individual image(s) you wish to include, and click Open.
Online Plan Room: select this to download plans for Digital Takeoff from an online plan room. Type the URL in the text box and click Retrieve, at which point your default Internet browser will open and log onto the web site you specified. From there, follow the web site's instructions for downloading plans. This can be set up in System Preferences > Database tab > Folders section.
Internet Site: select this option, enter the site address and click Go to launch a web browser to the specified URL. You will still have to manually download the plans to your hard drive. This can be set up in System Preferences > Database tab > Folders section.
In the Existing Drawings box:
Digital Takeoff will use the selected to any previously imported sheet as a revision for the current sheet.
If the drawing you need is already in the Existing Drawings box, select it and click Load.
Once you load your sheet, the File Name and Revision Information fields at the bottom of the Update Pan dialog are populated. These fields can be edited, if necessary.
If you are importing a multi-page .PDF or a multi-layered .PDF, you will be prompted to select the sheets or layers that you want to import. Click Yes at the prompt and the Advanced Image Manager tool will open. See the Advanced Image Manager Help for details.
Click OK on the Update Plan window once the revised plan file has been selected. You will be returned to the Manage Revisions dialog where the sheet you just selected is now the active Sheet.