Sometimes, when comparing revisions made to a sheet, one of the sheet images does not completely match up with the original. This may be caused by the source material being skewed when scanned or by the sheet resolutions being different.
The Sheet Alignment Tool (SAT) allows you to correct alignment issues between two sheet images. Click on the following items for more information.
![]() To
access the Sheet Alignment Tool
To
access the Sheet Alignment Tool
Access the Sheet Alignment Tool:
Go to Takeoff > Manage Sheet Revisions or use the Revisions icon in the tool bar. The Manage Revisions window opens.
If needed, select Add to add a revised sheet(s)
to the window.
Estimating sets the default color for the original version to red
and the first revision to green, third to blue, etc. Click on
the color cell if you want to change the colors. NOTE:
Do not set the color for your revised sheet(s) to black. After
two sheets are realigned with the SAT, any merged lines and shapes
will be colored black by default. If the revision sheet is also
set to black, you will not be able to tell the two revisions apart.
In the list, check Realign next to the sheets that you need to align.
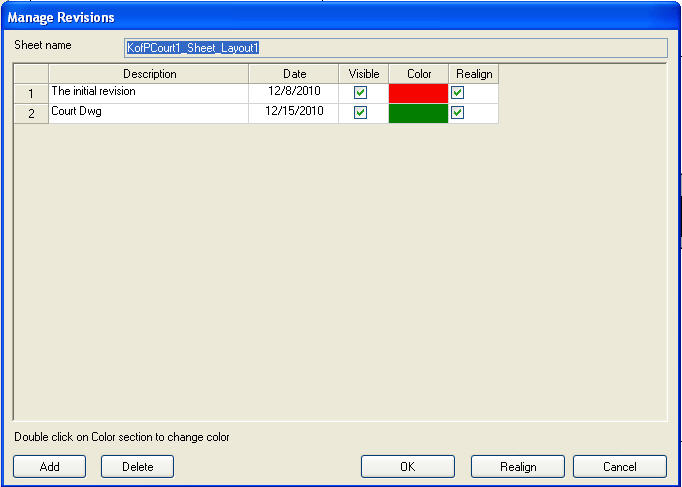
Select Realign at the bottom of the window to begin the Sheet Revision Tool process. The Sheet Revision Alignment Tool will launch, displaying the two selected sheets in blue and red. The blue layer is the original sheet and the red layer is the revision. You will be manipulating the red overlay to make it match up to the blue layout.
To align the two layers, click on the red layer and drag it over the blue image, matching them as closely as possible. The Sheet Alignment Tool contains tools that allow you to compensate for skewing or re-sizing. If your sheets require more detailed manipulating, use the Sheet Alignment Tool options in the Sheet Alignment Tool window in the next section.
Once you have aligned the sheets, select Save Revision or Merge Images to save your new sheet.
![]() Using
the Sheet Alignment Tools
Using
the Sheet Alignment Tools
The Sheet Revision Alignment Tool window shows the tool bar (descriptions below), the main work area and a status bar:
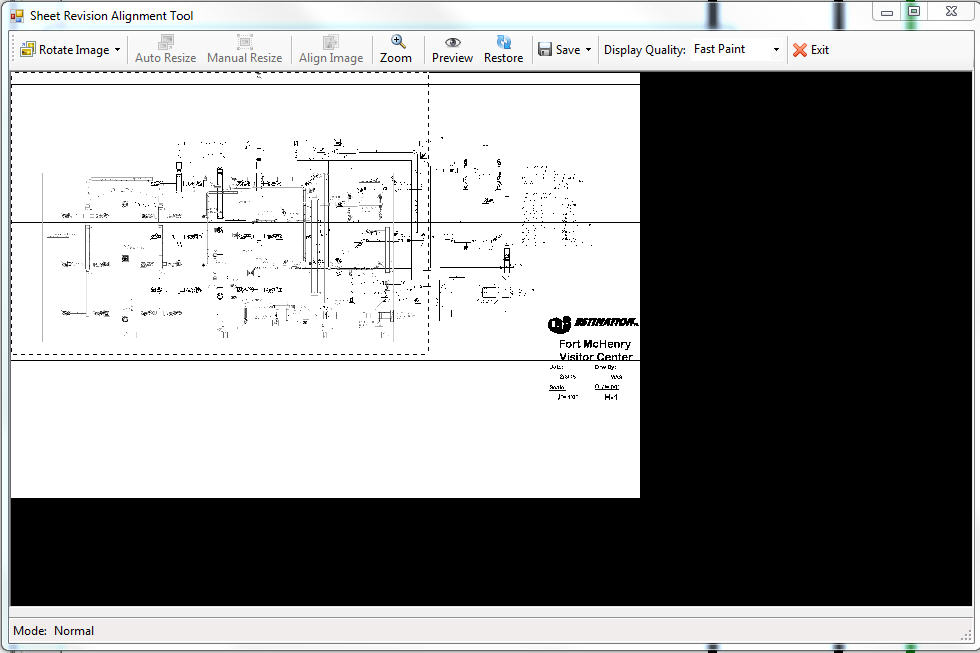
Rotate Image: This function rotates the red sheet image by the amount chosen from the drop-down list.
Auto Resize: This option is only available if the red sheet image and the blue sheet image are different resolutions. When the option is selected, the Sheet Alignment Tool tool attempts to resize the red sheet image to match the blue sheet image. See Resizing Sheets for more information.
Manual Resize: This option allows you to manually adjust the size of the red sheet image to better match the blue sheet image. In order to activate this function, you must first set 3 Control/Match Points on the red and blue sheets. Control/Match Points are set by right-clicking on the main window and choosing the relevant option from the drop-down menu. See Resizing Sheets for more information.
Align Image: This function allows you to adjust for any skew in the red image. To activate the function, you must first set both left and right Skew Match Points. To do so, right-click the main window and choose the relevant option from the drop-down menu. See Aligning Sheets in the next section for more information.
Zoom: The zoom icon is a toggle to turn on zoom capabilities if you are not using a mouse with a scroll wheel. Click the icon to activate the zoom. Then, when you press the right mouse button, the cursor changes to cross-hairs. You can now zoom-use the left mouse button to zoom in and use the right mouse button to zoom out. Click the zoom icon again to toggle the function off; the cursor changes back to the standard hand and the mouse buttons resume normal behavior.
If you are using a scroll wheel mouse: Using the mouse-wheel will zoom the image to the location of the cursor. Additionally, holding down the CTRL button on the keyboard while using the mouse wheel will scroll the main window horizontally, while hold SHIFT and using the mouse wheel will move the images vertically.
Preview: This option shows you what a merged sheet containing the red and blue images would look like. In the preview image, green lines are those that the Sheet Alignment Tool has matched from the red and blue sheets.
Restore: This option acts as an "undo" and changes the red sheet back to its state prior to being loaded into the Sheet Alignment Tool.
Save: Use this option to save changes made to the red sheet, or merge the red and blue sheets for use in Digital Takeoff.
Display Quality: This drop-down menu is used to control the quality of the red and blue sheets displayed in the main window. The higher the quality, the more detailed the sheets become. However, high quality settings will cause the Sheet Alignment Tool to perform slower. The main window area displays the red and blue sheets. Using the mouse-wheel will zoom the image to the location of the cursor. Additionally, holding down the CTRL button on the keyboard while using the mouse wheel will scroll the main window horizontally, while hold SHIFT and using the mouse wheel will move the images vertically.
Exit: Use this option to close the Sheet Alignment Tool without saving any changes.
There is a status bar at the bottom of the screen showing tips on how to use the Sheet Alignment Tool.
The Align Image function allows you to correct skewing that appears in your revised Sheet image.
To align your image:
Pick a point on the left-side of your image.
At this left-side point, match up your revision image with your original image (red) as closely as possible.
Right-click and choose Set Left Skew Match. A pin will display, marking the spot.
Next, choose a spot on the right-side of your images, where the images do not match.
Click and drag the revision image and match it up with the original image (red).
Right-click and choose Set Right Skew Match. A pin will display, marking the spot.
On the tool bar, click Align Image. The Sheet Alignment Tool will adjust the revision image.
The Auto Resize and Manual Resize functions allow you to correct any size differences between your original and revised sheet images.
The Auto Resize option is only available if your revision image (red) is a different resolution than your original image (blue). If both of your images are the same resolution, you must use the Manual Resize procedure.
To manually resize your revision image (red):
Pick a corner (top-left, top-right, bottom-left, bottom-right) of your two sheets and match up your original (blue) and revision (red) images as closely as possible.
In one of the remaining unmatched corners, right-click and mark your original image (blue) with a Control Point. Be sure that you choose the Control Point option that corresponds to the corner you are working on. A pin is placed to mark the spot for future reference.
Next, find the spot on the revision image (red) that would match the Control Point if the images were to match. This spot is a Match Point.
Right-click and select the Set Match Point option for the appropriate corner. A pin is created to mark the spot for future reference.
Repeat for the remaining unmatched corners of your images.
Select Manual Resize. The Sheet Alignment Tool resizes the revision image (red).