To use the Layers feature, you must first add Layers to your Digital Takeoff. You should repeat the following process to create as many Layers as you need for any given Job.
To add a new Layer to your Digital Takeoff:
Make sure you are in Takeoff mode.
1. Either
go to View
> Manage Layers or click ![]() . This will open the Edit Layer Properties window.
. This will open the Edit Layer Properties window.
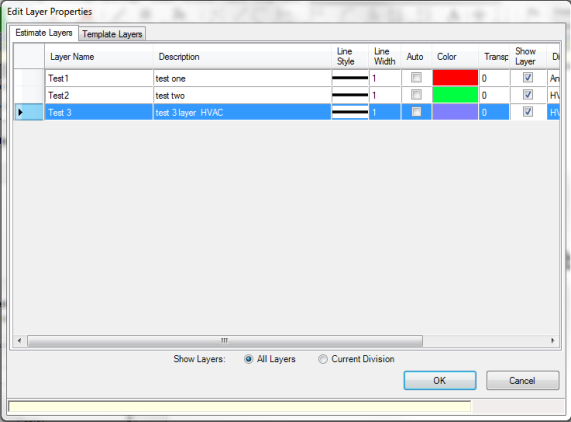
2. Right-click and select Add New Layer. This will open the Add a New Estimate Layer window.
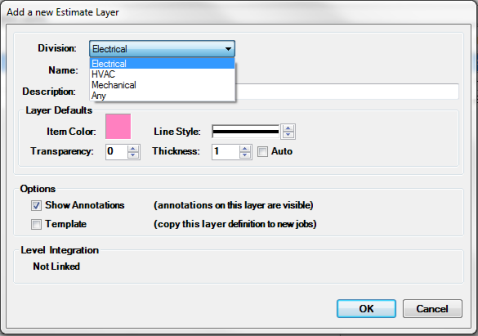
In the Division
field, select the division of your new Layer (HVAC, Electrical, Mechanical
or Any). By assigning a division
to a layer, you can easily keep layers for each division separate.
If you select HVAC, Electrical or Mechanical, this layer will only
display when in that division.
Layers which are assigned to the Any division will always display.
In the Name field, type the name of your new Layer (for example, "Fixtures").
In the Description field, type in the description you wish to attach to the Layer, if any.
Item Color: set the color used for this layer.
Line Style: choose how the Lines used in the Layer will look.
Transparency: select the transparency level of the annotations so that you can see the actual drawings when annotations are on top of them
Line Width: set the thickness of the Lines used in the Layer.
If you want this Layer to be visible, make sure there is a check mark in the Show checkbox.
In the Options section, select:
Show Annotations: check this box to make the annotations on this layer visible.
Template: check this box if you would like future Jobs to include this Layer definition. For more information, see Setting a Template Layer.
The Level Integration section will show you if this layer is linked to a Takeoff Level. If integration with Takeoff Levels has been set up, all newly created layers for the active division will automatically create a linked level in Takeoff once saved. You establish the level integration by linking your layers in the Digital Takeoff > System Preferences >Integration tab.
Click OK to save your layer and selections. You will see your new Layer listed in the Edit Layer Properties window.