Open topic with navigation
The Shape Recognition Tab
To
use the Shape Recognition tool, click on the Shape Recognition
tab, located on the top of the Takeoff
Tools Panel. It is here that you will configure and run Shape
Recognition.
Switching to the Shape Recognition tab will also change
your main window, displaying the Shape Recognition Count Worksheet as
well as other options.
In the section descriptions below, the numbers in the
() reference the numbers marking the various Shape Recognition tab elements
in the following image:
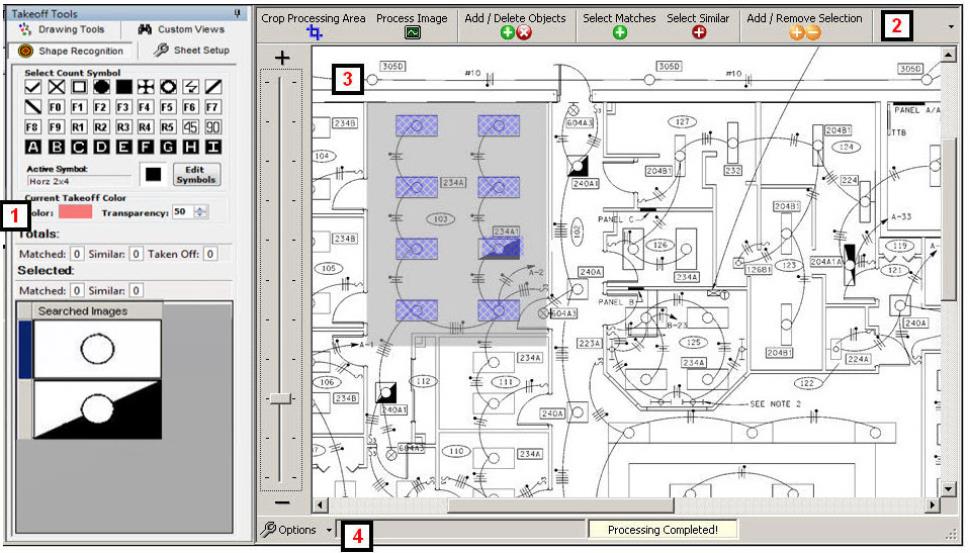
(1) Count Symbol Options:
These options allow you to choose the shape and color of your Object
Count symbol. The Count symbol is what will appear on your Takeoff image
after using Shape Recognition and taking off the resulting objects.
After you process an image, the total number of Matched
and Similar objects are displayed below Totals,
as well as the number of objects that have been taken off.
Under the Selected
section, the shapes that are being searched for are displayed under Searched Images. Clicking
on a specific shape will display the number of Matched and Similar objects
found in the Sheet image for that particular object. Having a shape
selected will also dynamically change the information displayed in the
main
window. A shape's Matched and Similar objects will be highlighted
in the main window when the shape is selected under Searched
Images.
(2) Shape Recognition Tools:
These options are the main tools
you will use to search, select, and take off objects identified by Shape
Recognition.
 Crop
Processing Area
Crop
Processing Area
This tool allows you to choose a specific area
of your Count Worksheet to scan for identified objects. To use,
click the Crop Processing Area
button, activating the tool. Next, left-click and drag your
mouse highlighting the area you wish to scan in gray (see image above).
Process
Image
This option will start the Shape Recognition process,
identifying objects on your Count Worksheet which match your identified
shapes, displayed under Searched
Images. The objects found on the Count Worksheet are
then highlighted in blue. A current count of these objects is displayed
in the bottom status bar.
Add /
Delete Objects
This tool allows you to either Add or Delete objects
in the takeoff group. The shape being added/removed is
determined by the selected shape under Searched
Images.
Adding an object will add a green "matched"
highlight, while deleting will remove any specific highlight on the
object.
To use, click Add/Delete
Objects to activate the tool. Next, left-click and hold
down the mouse button. An outline of the selected shape in Searched Images box displays.
Drag the outline over the desired object on your
Count Work Sheet. The object will then become highlighted.
The highlighted object is now part of the takeoff
group for that specific shape.
To delete an object, right-click on a highlight.
The highlight will disappear, indicating that the object has
been removed from the takeoff group.
Select
Matches
This function will select every Match (green-highlighted
object) on your Count Worksheet. These objects will then be
highlighted in yellow, indicating that they have been selected.
Note: The
type of object that is highlighted as Matched and Similar in your
Count Worksheet is dependant on the shape you have selected under
Searched Images.
Select
Similar
This function will select every Similar (red-highlighted
object) on your Count Worksheet. These objects will then be
highlighted in yellow, indicating that they have been selected.
Note: The
type of object that is highlighted as Matched and Similar in your
Count Worksheet is dependent on the shape you have selected under
Searched Images.
Add/Remove
Selection
This function allows you to add individual objects
to the Takeoff Group. To use this function, click Add/Remove
Selection. You will enter a mode where any object you
left-click will be added to the Takeoff Group (the highlight of the
object will become yellow). Alternatively, right-clicking an
object will remove it from the Takeoff Group (the highlight disappears).
Takeoff
Group
When you are ready to take off your objects, click
on Takeoff Group. Objects
in the Takeoff Group (yellow outline) will now become highlighted
on your Count Worksheet. At this point you can also switch to
Standard Takeoff and takeoff the items. Annotations will also
be added to your Takeoff Image, based on your Object Count Symbol
settings.
(3) Shape
Recognition Count Worksheet: The
Count Worksheet is a copy of your Sheet image file, which is used solely
for Shape Recognition. The Shape Recognition Tool uses the Count
Worksheet to outline objects and will highlight objects added to takeoff.
Example
of Count Worksheet symbols
(4) Shape Recognition Options/Status
Bar : The bottom of the Shape
Recognition screen contains several elements, such as the Shape
Recognition options, Status
Bar, and image tabs. The Status Bar displays the count of currently
selected items ready to be taken off, the Count Worksheet image status,
as well as, which mode you are in.
Once you have familiarized yourself with the elements
of the Shape Recognition tab, continue to Using
Shape Recognition.
© 2018 Viewpoint, Inc.
Construction Specific Software that Integrates
www.viewpoint.com
For support on the Web (and Online Support Chat), visit
ClearView.
