Open topic with navigation
Materials and
Service Management
The selections on the File
> Maintenance > Materials and Service Mgmt menu will vary.
Refer to the information specific to a plug-in for its Materials and Service Mgmt selections.
This section contains information about common selections,
that is, those that appear on the Materials
and Service Mgmt menu for most Viewpoint MEP Estimating plug-ins.
Author This window allows you to
add Author information that can be used in the Materials Management program.
This window allows you to
add Author information that can be used in the Materials Management program.
Select Add to open the Add Authors window, where you can enter in
the name of the author you wish to add.
To change an author name, select Edit.
To delete an author, select Delete.
When finished, select OK to save your changes
and close the window.
CategoryThis
window allows you to add Categories that can be used in the Materials
Management program.
Select Add to
open the “Add Categories” window, where you can enter in the new category.
To change a category, select Edit.
To delete a category, select Delete.
When finished, select OK to
save your changes and close the window.
Cost CodesThe
Cost Codes window allows you to categorize and store cost codes for databook
items. Cost Codes and Cost Types are ultimately used in the Materials
Management plug-in as ways of breaking down your orders for accounting
integration or historical analysis.
Cost Types can be any categorization that is appropriate for you and how
you classify orders. Examples of cost types include Category, Phase, and
Section. Cost Types are broken down into Cost Codes, which further classify
an order. In a Category cost type, you might have cost codes such as Conduit,
Elbows, Fittings, etc.; a Section cost type may contain Branch Lighting,
Feeders, and Panels cost codes.
Select File > Material and Service
Mgmt > Cost Codes.
The Cost Codes display is comprised of two parts: Cost Types in the top
grid and Cost Codes in the bottom grid. The Cost Types are general descriptions
that “hold” the descriptions of the Cost Codes. When you highlight a Cost
Type, its Cost Codes display below. The GL column in the Cost Code grid
indicates General Ledger. Cost codes can be set up with a general ledger
account number or name.
Use the function buttons to the left to add, edit, and delete cost types
and codes. The Add function allows you to create a new cost type or cost
code. When you select the Add function for cost type, the New Cost Type
window displays, which only has a field for entering the cost type name.
The Add function for cost code displays the New Cost Code window which
contains fields for entering a cost code and a name. If the cost code
can be tied to a general ledger account, a code for that can be entered
as well.
Select (highlight) the cost type or cost code you want to edit, and then
select the Edit button. Similar windows display as described above for
the Add function, where you can make changes to the existing information.
Use the Delete button to delete the selected cost type or cost code. A
window will display prompting you to confirm the deletion.
Databook ItemsThis option
accesses the Material and Service Management databook.
The Databook contains all of the manufacturer and item file information.
When you edit an item in the Databook, all of the pricing information
is also there, together with its size, pricing code, etc.
FOB TypesThis
window allows you to enter, edit or delete FOB types.
To add a new FOB type, select Add to
open the “New FOB Type” window. Type in the name of the new
FOB type and press OK.
To edit a FOB type, select Edit.
To delete a FOB type, select Delete.
IndustriesThe standard
Industries defined in Estimation are Electrical, Mechanical, HVAC, and
General. The maintenance selection, Industries,
allows you to set up further industry descriptions, perhaps if you are
working on something completely different (e.g., security systems) and
want items that pertain to that industry to be identified as such.
The Industries selection appears only in the Maintenance menu for Items
and Favorites in the Databook.
Select File > Maintenance > Industries
to display the Industries window.
This window shows a grid with a single column for industry descriptions.
Use the function buttons at the bottom to add, edit, and delete industries.
Add: The Add function
allows you to create a new industry. When you select the Add function,
the Add Industry window displays, which has only a single field for entering
the industry's description.
Edit: Select (highlight)
the industry you want to edit, and then select the Edit button. A similar
window displays as described above for the Add function (the title reads
“Edit” instead of “Add”), where you can make changes to the existing information.
Delete: This function
will delete the selected industry. A window will display prompting you
to confirm the deletion. If you answer Yes to the Confirm
Delete prompt, if there are any items in the Databook assigned
to this Industry, the program will then prompt Do
you want to delete thennitems
with an Industry of 'description'?
If you answer No, only the Industry is deleted--any items with that Industry
will remain, however, their Industry field will be blank. If you answer
Yes, the Industry description and all items assigned to that Industry
will also be deleted from the Databook. This provides a quick way to clean
out unwanted items from the Databook.
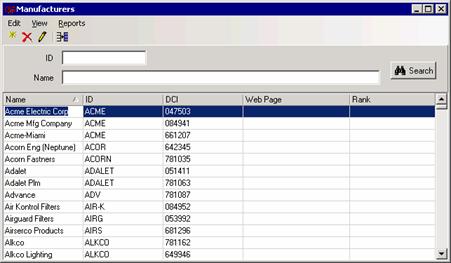
ManufacturersFrom the
Estimating main menu, selecting File
> Maintenance > Materials & Service Mgmt > Manufacturers
accesses the file containing manufacturer data including name, abbreviation
(short name), DCI code, rank, web site address, and more. The manufacturers
set up here appear in the choices for Manufacturer when editing a record
in Items and Favorites.
When you first receive Estimating and the Databook plug-in, the Manufacturers
file will be empty. You can either build it from scratch (following the
instructions in Adding
Manufacturers) or, if you have the Materials Management plug-in, use
its Import
function to import manufacturer short names, names, and DCI codes from
the Merlin purchasing program.
The Manufacturers sidebar function contains a grid and searching capabilities.
Figure 1 shows a sample Manufacturers file, imported from Merlin (using
the Materials Management Import function).
Once items are imported or once you have built up a large Manufacturers
file, you can perform searches to find specific manufacturers. See Searching
For Manufacturers. You can also edit manufacturers by following the
instructions in Editing
Manufacturers.
PO CategoriesThis
window allows you to enter PO Categories.
To add a new Category, select Add to
open the “New Category” window. Type in the name of the new
Category type and press OK.
To edit a Category, select Edit.
To delete a Category, select Delete.
PO TypesThis
window allows you to enter PO Types.
To add a new Order Type, select Add to
open the “New Order Type” window. Type in the name of the new
Order Type and press OK.
To edit an Order Type, select Edit.
To delete and Order Type, select Delete.
Price TypeThis
window allows you to enter Price Types.
Type any price information in the “Price <#>” fields. The
large field at the bottom of the window can be used to enter any desired
notes.
Select OK when finished.
Shipping Methods This
window allows you to enter Shipping Methods.
To add a new Shipping Method, select Add to
open the “New Shipping Method” window. Type in a name, choose
a shipping company, and enter in any notes. Press OK when you are finished.
To edit a Shipping Method, select Edit.
To delete a Shipping Method, select Delete.
Note: The shipping company field is drawn from the Suppliers
list. For more information refer to Suppliers.
SourcesThis
window allows you to enter Sources.
To add a new Source, select Add to
open the “New Source” window. Type in the name of the new Source
and press OK.
To edit a Source,select Edit.
To delete a Source, select Delete.
For more information, see Sources.
SubcategoriesThis window allows you to enter Subcategories.
To add a new Source, select Add to open the “Add Subcategories” window. Type
in the name of the new Subcategory and press OK.
To edit a Subcategory, select Edit.
To delete a Subcategory, select Delete.
SuppliersThis option allows you to add Supplier
to use with the Materials and Service Management plug-ins.
Use  to add a new supplier. This opens the New Supplier
window. Enter as much information as you have about the supplier in the
tabs and fields provided.
to add a new supplier. This opens the New Supplier
window. Enter as much information as you have about the supplier in the
tabs and fields provided.
Supplier TypesThis
window allows you to enter Supplier Types.
To add a new Supplier Type, select Add to
open the “New Supplier Type” window. Type in the name of the
new Supplier Type and press OK.
To edit a Supplier Type, select Edit.
To delete a Supplier, select Delete.
Tax ProfilesThe Tax
Profiles selection appears on all Maintenance menus for most plug-ins.
Select File
> Maintenance > Tax Profiles.
The Tax Profiles module has two "pages": Tax Profile and Tax
Authority. The Tax Profile page has two parts: Tax Profiles in the top
window and tax profile details in the bottom window. The Tax Profiles
are descriptive names for the tax(es) applied. The tax profile details
are the actual tax percentages, what order they are applied, who collects
the taxes (Tax Authority), and to what they are applied.
The Tax Authority page is where you set up all of the taxing entities which
you encounter when ordering materials, when invoicing, etc.
The steps in setting up Tax Profiles are as follows:
Create your applicable Tax Authorities. See Creating
Tax Authorities.
Create Tax Profile names and codes. See Creating
Tax Profile Names.
Create the details for each Tax Profile. See Creating
Tax Profile Details.
TermsThis
window allows you to enter Terms.
To add a new Term, select Add to
open the “New Terms” window. Type in the name of the new Term
and press OK.
To edit a Term, select Edit.
To delete a Term, select Delete.
Units of MeasureThe unit
of measure is the unit by which an item is priced.
The Units
of Measure selection appears on all Maintenance
menus for most plug-ins so it is discussed here, rather than in each individual
plug-in reference.
Select File > Maintenance > Units of Measure to display the
Units of Measure window.
This window shows a grid containing two columns: UOM (Unit of Measure)
and Symbol. The UOM column contains a full description of the measurement
unit, while the Symbol column is an abbreviation of the unit.
Use the function buttons to add, edit, and delete units of measure.
Select Add to create a new unit
of measure. When you select the Add function, the New Unit of Measure
window displays, which only has fields for entering the unit’s symbol
and name.
Select (highlight) the unit of measure you want to edit, and then select
Edit. A similar window displays
as described above for the Add function (the title reads “Edit” instead
of “New”), where you can make changes to the existing information.
Clicking Delete immediately deletes
the selected unit of measure. A window will display prompting you to confirm
the deletion.
© 2017 Viewpoint, Inc.Construction Specific Software that Integrateswww.viewpoint.com For support on the Web (and Online Support Chat), visit
ClearView.