Summary File Maintenance (SFM) Preferences Window
From
Summary, select File > Preferences.
The Preferences window opens for you to select the options and settings
desired for Summary reports.
In the General Options section, select:
- Run Combined All/Estimate File Pricing on startup: If this option is selected, if the Combined All - Estimate File Pricing summary does not already exist when you first go into Summary, it will automatically been run. If not selected, the Combined All - Estimate File Pricing summary will not be run until a summary is run.
- Run Print Preview on Quote Master: If this option is selected, when Quote Master is run, a print preview of the report will display. If not selected, the quote is displayed in the Summary screen without previewing first.
- Enable Hot Tracking: This option determines whether Hot Tracking is turned on or off. Hot Tracking will underline the Summary item that the mouse cursor is currently over.
- Show prompts for manual values: This option allows you to show prompts for manual values in summaries.
- Show
prompts for quote values: This option allows
you to show prompts for quote values in summaries.
You can setup the color for the manual and/or quote prompts by using the Edit Colors button on the Preferences window. If these prompts are shown, any manual/quote value will display with a different background color to alert you to enter a value for the item. - Display Full UOM Description: When this option is checked, unit of measures will be fully spelled out instead of abbreviated (e.g. “ea” becomes “each,” “lbs” becomes “pounds,” etc). For this option to take effect, the Summary report must be closed and re-opened.
In the Printing & Export Options, select:
The two text fields for Print 'Adj Mat Unit' column as and Print 'Adj Lbr Unit' column as allow you to enter different titles for these columns to appear on the Summary report (e.g., you may prefer that your customers see a column titled "Price" rather than "Adj Mat Unit" on the report).
Select Custom Print Header to open the Customize Printing dialog where you can select how the fields on your report display.
- In the Header Display Format section, select to display the company header in the center (Centered Display) or along the sides (Wide Display)
- In the Header Elements section, select the box next to the data, job and estimate information you want displayed.
- In the Company Info section, select the box next to the company information you want displayed.
- In the Report-Specific section, select the box next to the report information you want displayed.
- In the Summary-Specific Options section, select the box next to the items you want to view in the report: Show Empty Sections, Show Notes, Show Empty Level, Show Material/Labor Sources. De-select these options to "hide" that data.
Select OK after choosing your report settings.
In the Level Display Options section:
- Checking one of these options to choose what
is displayed in the tree view (printed reports) for each level.
The options include: Display Level Type Name, Display Level ID, Display Level Number, and Display Level Name. - VIEW PHASE BREAKOUT BY: Use this drop down to select how you want to view and print the Phase breakout (by material, field labor, shop labor, weight, area/volume, or your user defined phase, etc.)
- VIEW SUBTOTAL BREAKOUT BY: Use this drop down to select how you want to view and print the Subtotal breakout (by material, field labor, shop labor, weight, area/volume)
In the Decimal Places section:
Use these fields to set the number of decimal places to be shown for both material and labor. You can either manually enter a number or use the up and down buttons to select a number. A representation of the number you choose is shown to the right of the input field.
In the Variance section:
Variance compares the current unit value (ignoring adjustments) to a value from Databook, and shows the difference in terms of unit and/or percentage.
- The Percent option divides the unit difference by the compared unit and multiplies by 100. For example, if you had some wire that was originally priced at 1.34$ per foot, but your supplier quotes a price of 1.14$, which you enter. Your variance would be -.20$ (1.14 - 1.34), but if displayed as a percentage, it would be -14.93% (.20 * 100 / 1.34). {100 * ( (current - compare) / compare)}
- If Unit Difference is selected, the program subtracts the compared unit from the current unit. { current - compared }
You can select which unit from Databook they wish to
compare using the ![]() Calculation
Method option.
Calculation
Method option.
Additional
Variance Information: ![]() Limitations
/ Exclusions
Limitations
/ Exclusions
In the Miscellaneous Options section:
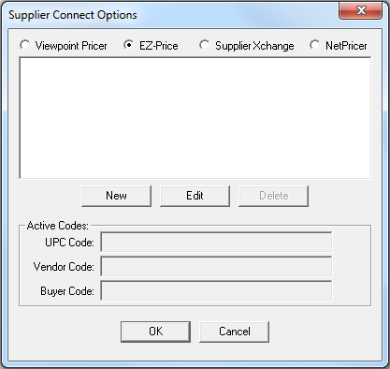
SUPPLIER CONNECT: Opens the Supplier Connect Options window where you select your preferred service for acquiring pricing information. Select Viewpoint Pricer, EZ-Pricer, NetPricer, or Supplier Xchange. You can set up custom columns in Summary to be used with your selected service.
Edit Colors: Allows you to select the colors of the units in the Summary Items Grid View. Click Set to Default to reset the colors to their original system settings. See Colors in SFM for more information.
- Check Prompt to Save Changes to the Estimate Pricing File if you want Estimating to prompt you to save the changes made to the Estimate Pricing File.
- Check Retain Edited Values after Updates are Appliedto have the edited items remain marked as edited, even after the Summary Report is updated.
In the Accounting Integration section: This section is visible if you have already selected an Accounting Integration program. This integration can be set from the main Estimating screen, File > Options > General Options.
- Create Separate Material and Labor Items: When this preference is set, Accounting Bids will create separate cost codes for Material and Labor. If the option is not set, then Material and Labor items will continue to be combined. This option will only appear if you have an accounting software application selected in the Accounting Integration tab.
- Export Codes: Use this option to choose which codes are sent to the accounting software application selected in the Accounting Integration tab. The Select Bid Export Pricing Codes dialog will display. Select the UPC, Vendor and Buyer pricing codes you want exported.
When you are finished selecting your preferences, select OK to accept any changes you have made and return to Summary. Select Cancel to return to Summary without saving any changes you have made.