Editing User Defined Menu Keys
To edit keys, double-click
the key you want to edit (or click the key you want to edit and select
Edit > Edit).
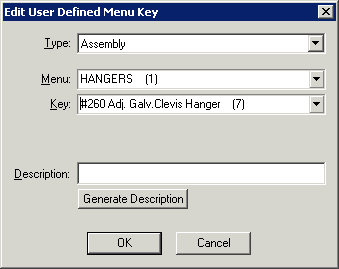
The Edit User Defined Key
window appears.

Use the drop-down menu to select the type of key you
would like to make. The selections are Assembly,
Databook Key, and Databook
Item.
 Assembly
If you choose to make an Assembly Key, the Menu and Key
fields appear.

Assign an Item to your custom Key by using the
Menu and Key fields to point
to it. For example, the image below assigns the Key to takeoff
a Adj. Galv.Clevis Hanger Assembly.

 Databook
Item
If you choose to make a Databook Item Key, the
CATEGORY, KEY,
and SIZE fields appear.

Assign an Item to your custom Key by using the
CATEGORY, KEY,
and SIZE fields to point to
it. For example, the image below assigns the Key to takeoff
a 1/4" L-HARD TUBE Copper Pipe.

 Databook
Key
If you choose to make a Databook Key, the CATEGORY and KEY
fields appear.

Assign an Item to your custom Key by using the
CATEGORY and KEY
fields to point to it. For example, the image below assigns
the Key to takeoff a L-HARD TUBE Copper Pipe.

Always prompt for size:
If selected, you will be
prompted to select the Size of the Key's Item when you take it off.
Description:
Once you have populated the available fields, you can create
your own description of your User-Defined Key, or click Generate
Description.
If you select Generate
Description, a description will be created based on the selections
you made for the available fields.
Select OK when
you are finished. The key you have edited will now display the new description.


