Loading Sheets into Digital Takeoff
In order to use Digital Takeoff, a Sheet must first be loaded into the Main window and scaled.
A Sheet is a digitized “plan” (usually an image file or .PDF) that is loaded into Digital Takeoff. Before you can use Digital Takeoff, you must create or load at least one Sheet for the Job you are working with. A single Job can have multiple Sheets.
Digital Takeoff allows you to add Sheets to your Job at any time, even after you have begun working. You can also delete Sheets from your Job, or rename new or existing Sheets.
To add, remove, or rename Sheets:
- From the Takeoff menu, select Sheets or Takeoff > Get Plans.
- The Sheets dialog opens. This window offers you various options for adding plans to your Job:
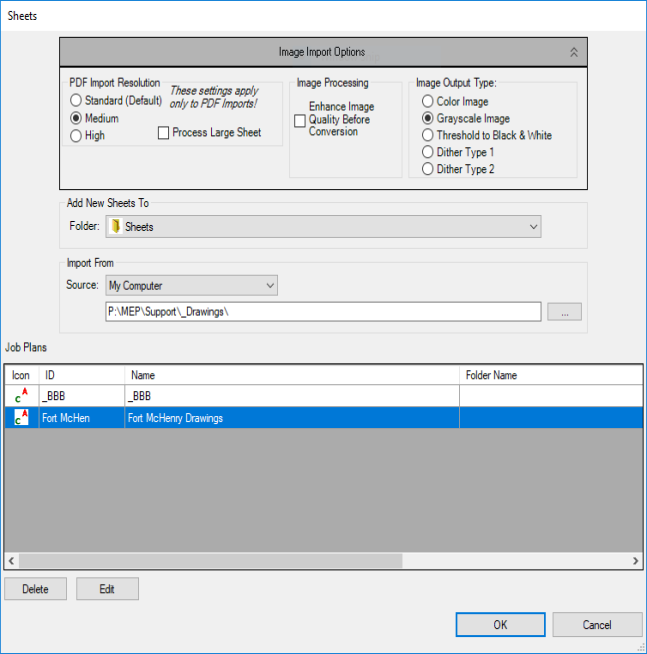
You can select and delete multiple plans at once in the Job Plans window.
This window can be resized and repositioned as desired. The size and position will be retained.
The Image Import Options:
These controls allow users to configure how they want new sheets to be imported. If desired, users can collapse this set of controls to reduce the number of controls on the screen and increase the area of the Job Plans.
In the PDF Import Resolution section:
These settings are used only when importing a .PDF.
These options control the quality of the sheets imported from PDFs. The higher settings may result in more legible images, but use more memory and may cause performance issues. Very large sheets also may not be able to be imported at the higher settings on some systems. If a sheet that you have imported is blurry or hard to work with, try importing it again at a higher setting.
- Standard (Default): This setting is equivalent to 100 DPI.
- Medium: This setting is equivalent to 150 DPI.
- High: This setting is equivalent to 200 DPI.
Process Large Sheet: Select this check box if you are working with a large image and had previously received an out of memory error when trying to load the sheet.
Use Advanced Image Manager for Single Page PDFs: Select this check box if you want to use Advanced Image Manager so that you can see the different effects on the image before importing the sheet.
In the Image Processing section:
Enhance Image Before Conversion: Check this box if you want Estimating to perform automated manipulations on the image to improve quality before importing it.
In the Image Output Type section:
Digital Takeoff can perform various conversions on images to make them easier to work with. These options each have advantages and disadvantages, therefore users may wish to make different selections for each sheet they import.
- Color Image: If you are importing a color image, and wish to work with the image using its existing colors in Digital Takeoff, select Color Image. This will bring the image without modifying the colors of the image. However, this option will use more memory for each image, and larger images may not be able to be imported on some machines. Images may also exhibit a performance delay in comparison to other types.
- Grayscale Image: If you do not wish to view the colors on the original drawing, one option is to import it as a grayscale image, which converts all colors to shades of gray. This option uses less memory than Color Image, but more memory than the other options. Therefore it may perform better than the Color Image, but not as well as the other options.
- Threshold to B&W: This will convert the image into a black & white image, containing no shades of gray. Each point (or pixel) can only be black or white. Therefore, when converting the image, the program will examine each pixel of the original drawing and convert them to black or white, eliminating all colors and/or shades of gray. This is the way that previous versions of Digital Takeoff imported images. This option (along with Dither Type 1 & 2) uses the least amount of memory and offers the best performance. If you are importing images that do not contain colors, including gray, this option is recommended.
- Dither Type 1: Dithering is a process of making a pure black & white image appear to contain shades of gray by removing dots from lines and colored areas. Dither Type 1 is one pattern that can be applied to achieve this effect. Like Threshold to B&W, this option uses the least amount of memory, and offers the best performance. This option can also appear to display gray lines and areas on the drawing, but it does sacrifice the quality of Grayscale and Color images in favor of better performance.
- Dither Type 2: This option functions identically to Dither Type 1, it simply uses a different pattern to create the illusion of shades of gray. In all other respects, it functions identically to Dither Type 1.
When importing images, it is important to know what the source image is: if it is a full color drawing, or it contains gray / shaded areas, or if it is just a black & white drawing. For performance reasons, you should attempt to bring it in with the higher performing options (Threshold to B&W, Dither Type 1, or Dither Type 2) unless you need the additional shades of gray or color.
The Add New Sheets To section:
Users can choose what folder they want to import their new sheets into using the Folder drop-down.
In the Import From section:
Users can specify where they wish to import their plans from:
- Current Job: Click the … button to browse for a plan inside of the current job’s folder.
- Default Location: Click the … button to browse for a plan inside of the default location (previously known as the Image Repository).
- My Computer: Click the … button to browse for a plan from somewhere on your hard drive, on a pin drive, on your network, etc.
- Online Plan Room: Click the … to open the default browser to the entered URL.
In all cases, users can select multiple plans to import at the same time.
-
Digital Takeoff will then add the plans you selected in Step 2 to any previously-imported plans listed in the Job Plans box. To remove plans from the list, click on each plan that does not belong. Then click Delete.
-
To rename any of the plans and/or change the folder a sheet is in, click Edit. The Edit Sheet window will appear, and you can change any of the information about of the sheets inside.
-
When you are finished, click OK.