Saving Screen View Layouts
Any time you change the layout of the main window, you can save the new look as a screen view. This includes any change you make to the screen view: grid column arrangement, background color or font, search tabs, report settings (remember that what can be changed in a screen view depends on what side bar function is active; that is, not every side bar function contains search tabs or report settings, for example).
The following methods can be used to save a screen view layout:
- SelectView > Save View. Then select the position for the view. When you select the view position, the program gives you an opportunity to give the view a meaningful name.
- Select
the
 key cell on the PowerPad to display the Screen
Views window. Select (highlight) the position where you
want to save the view. Use Save View to
save the current view.
key cell on the PowerPad to display the Screen
Views window. Select (highlight) the position where you
want to save the view. Use Save View to
save the current view.
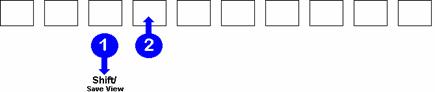
- You can also use a combination of PowerPad key cells to save a screen view. First, choose a position to place it. Then, simply press [Shift/Save View], then the key cell to save the layout (you don't have to hold the Shift/Save View key while pressing the key cell). Figure 1 illustrates these steps: Shift/Save View is pressed first, then a blank key cell.
Figure 1
The next time you want to see this screen view, all you will have to do to display this layout is press the same key cell.
NOTE – If you save a screen view layout to a position that already contains a layout, the new layout overwrites the old one. The old one is then lost.